Game Code
About
Use these different code pieces to test the hardware and the final game.
Install Arduino and add the following libraries (added everything installed, not sure which is needed for what yet:
Adafruit Neopixel 1.15.4 (v2: 1.12.3)
DFPlayerMini_Fast 1.2.4
DFRobotDFPlayerMini 1.0.6
FastLED 3.10.3 (v2: 3.3.3)
Liquid Crystal Library
- hd44780 1.3.2 by Bill Perry github compatible with most everything but 6 years old. <--Try this one.
- LiquidCrystal I2C 1.1.2 by Frank de Brabander referenced from the manufacturer's webpage, Github
- LiquidCrystal_I2C by Martin 1.1 (Original version with LCD.h library. (2.0 github.) v2.0 doesn't have LCD.h
- I2C_LCD 0.2.6 by Rob Tillaart Github Branched from Bill Perry, experimental.
- Adafruit LiquidCrystal 2.0.4, Github
SerialMP3 by nhLuan 1.1.0 or Proyectil DG3300 by Misael Reyes 1.0.2
Adafruit Circuit Playground 1.12.0
Adafruit GFX Library 1.11.11
Adafruit GPS Library 1.7.5
Adafruit ILI9341 1.6.1
Adafruit LED Backpack Library 1.5.1
Adafruit SleepyDog Library 1.6.5
Adafruit STMPE610 1.1.6
Adafruit Touchscreen 1.1.5
Adafruit Zero DMA Library 1.1.3
Adafruit Zero FFT Library 1.0.6
Adafruit Zero PDM Library 1.2.3
Adafrujit BusIO 1.16.2
Bounce2 2.71
Bridge 1.7.0
Easy NeoPixels 0.2.3
FireTimer 1.0.5
NeoPixel Painter 1.0.0
RTClib 2.1.4
Servo 1.2.2
SevenSegmetTM1637 1.1.0
TinyWireM 1.1.3
WaveHC 1.0.5
Buttons
Hookup the RESET button to xxx
Hookup 1 normal game button (bottom row reference) to XXX.
This test should just turn the button light on, off, on off on startup then when holding down, the button will light up for X seconds then turn off.
Might use this code to hook up all 6 buttons then test colors/pushing of them.
The Game Over LOSER button, might be illuminated, might not pending what I want to do.
Note: The Game buttons NEGATIVE/GROUND connections CANNOT be jumped together, they must plug into their own ground pins seperately.
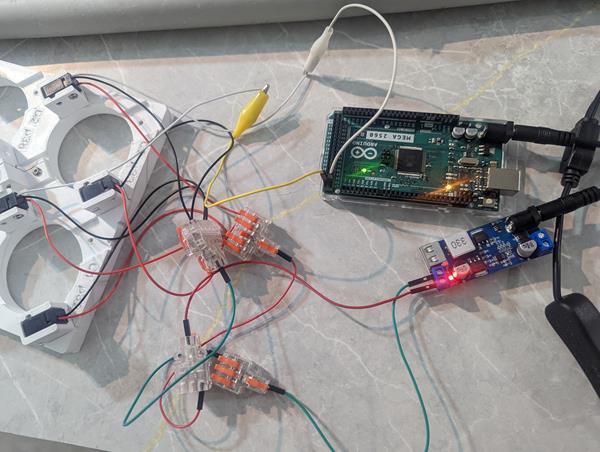
IR Breakbeam Sensor
Connect Power to: WALL/Buck board
Connect Ground to: WALL/Buck board
Connect Data Cable to: 22 (for A1), 23 (for A2), etc
Make sure you use the Onboard LED to see when the beam is broken/triggered.
Console Log
Testing 2 wires.
Connect Ground to: WALL/Buck board
Connect Data Cable to: 22 (for A1), 23 (for A2), etc
Make sure you use the Onboard LED to see when the beam is broken/triggered.
Console Log
A1hasObstacle: 0
A2hasObstacle: 0
- - Row A1/A2 done - -
Testing 2 wires.
LEDs
Cut to 25 LEDs
Hook up Power to: WALL/Buck board
Hook up Ground to: WALL/Buck board
Hook up Data line to pin: 12

Hook up Power to: WALL/Buck board
Hook up Ground to: WALL/Buck board
Hook up Data line to pin: 12
LCD
1110
Wire the Blue SCL to pin: 21.
Wire the Yellow SDA to pin: 20.
NOTE:
Option 1: Connect all wires to Mega.
Option 2: Use Barrel Y splitter, Ground/Power to Buck converter.
Option 3: If using USB-B to Mega and Ground/Power to Buck converter you MUST attach ground from buck to mega.
Sunflounder: Sunfounder LCD: http://wiki.sunfounder.cc/index.php?title=I2C_LCD2004
Maker Guide - https://www.makerguides.com/character-i2c-lcd-arduino-tutorial/
LCD Custom Character Creator - https://maxpromer.github.io/LCD-Character-Creator/
Top 20 Arduino LCD Animation Projects

New Testing out Bill's hd44780 code
Wire the Blue SCL to pin: 21.
Wire the Yellow SDA to pin: 20.
NOTE:
Option 1: Connect all wires to Mega.
Option 2: Use Barrel Y splitter, Ground/Power to Buck converter.
Option 3: If using USB-B to Mega and Ground/Power to Buck converter you MUST attach ground from buck to mega.
Sunflounder: Sunfounder LCD: http://wiki.sunfounder.cc/index.php?title=I2C_LCD2004
Maker Guide - https://www.makerguides.com/character-i2c-lcd-arduino-tutorial/
LCD Custom Character Creator - https://maxpromer.github.io/LCD-Character-Creator/
Top 20 Arduino LCD Animation Projects
New Testing out Bill's hd44780 code
GD3300 (aka XY5300, and V2: DF Mini Player) and PAM8406 with Speakers
GD3300 Serial MP3 Power to Arduino Mega, 5v pin, ground to Arduino Ground.
TX to Arduino 10, RX to Arduino 11.
PAM8406 3.5 to GD3300 3.5 jack.
PAM8406 to Buck 5v/ground.
Connect speakers to PAM8406.
Insert SD Card with files copied over to test the music player. Download mp3s 2026-02-16
NOTE: The GD3300 unit has all the components to help w/ static, feedback, etc. It also makes it easier by having a 3.5 jack that connects to the PAM8406 3.5 connector.
Version 2 would need a ground from Arduino to Buck to stop static feedback.
NOTE 2: Version 2 (DF Mini Player), the mp3 player plays the music in the order it was copied to the card. I labeled each song as 001Laser, 002Bell, etc then copied each one by one into the root folder. V3, GD3300, might be able to use sub folders and play songs based upon the number labels but I need to test it first.
NOTE 2 Follow up: I Found a program that will sort files in alphabetical order so it doesn't matter how you copy them if you sort after.
FAT Reorder, others not tested: FAT Sorter, Fat Drive Sorder
NOTE 3: Using the folders/sub folder and number call, it doesn't matter what order they are, just in the right location/named correctly.

Music compatible with DF Music Player
Music for GD3300
TX to Arduino 10, RX to Arduino 11.
PAM8406 3.5 to GD3300 3.5 jack.
PAM8406 to Buck 5v/ground.
Connect speakers to PAM8406.
Insert SD Card with files copied over to test the music player. Download mp3s 2026-02-16
  All the files can be in the ROOT directory with numbers and can be played by using:
  myDFPlayer.play(29); delay(20);

  But v3 uses sub folders.
  The folders must have 2 digits, 01, 02, 03, etc.
  File names can be anything but must start with 3 digits. /01/001_laser.mp3, /02/002_winner.mp3, /02/029_loser.mp3 and will be called using the number.
  This will make it easier to add/remove songs and change code.

  myDFPlayer.playFolder(1,1);  Serial.println("Play Folder 01, track 001_laser.mp3"); delay(5000);
  myDFPlayer.playFolder(2,2);  Serial.println("Play Folder 02, track 002_winner.mp3"); delay(5000);
  myDFPlayer.playFolder(2,29); Serial.println("Play Folder 02, track 029_loser.mp3"); delay(5000);

  Make sure you have a delay of at least 20 after every play call.  delay(20);
NOTE: The GD3300 unit has all the components to help w/ static, feedback, etc. It also makes it easier by having a 3.5 jack that connects to the PAM8406 3.5 connector.
Version 2 would need a ground from Arduino to Buck to stop static feedback.
NOTE 2: Version 2 (DF Mini Player), the mp3 player plays the music in the order it was copied to the card. I labeled each song as 001Laser, 002Bell, etc then copied each one by one into the root folder. V3, GD3300, might be able to use sub folders and play songs based upon the number labels but I need to test it first.
NOTE 2 Follow up: I Found a program that will sort files in alphabetical order so it doesn't matter how you copy them if you sort after.
FAT Reorder, others not tested: FAT Sorter, Fat Drive Sorder
NOTE 3: Using the folders/sub folder and number call, it doesn't matter what order they are, just in the right location/named correctly.
Music compatible with DF Music Player
Music for GD3300
Final V3
Currently updating this code, not verified yet.
Final v2 (old)
This is currently Version 2, I will update with version 3 after the build is done.